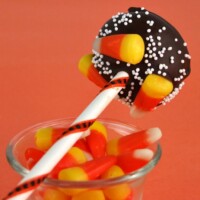
Pumpkin Cake Pops
These are a fun sweet treat for fall!
Servings 50 pops
Calories 157kcal
Ingredients
CAKE:
- 3 cups all purpose flour
- 1 tablespoon ground cinnamon
- 2 teaspoons ground ginger
- 2 teaspoons baking powder
- 1 3/4 teaspoons ground allspice
- 1 teaspoon baking soda
- 1 teaspoon salt
- 1/2 teaspoon ground nutmeg
- 1 1/2 cups granulated white sugar
- 1 cup packed brown sugar
- 1 cup canola or vegetable oil
- 4 large eggs
- 1 15-ounce can unsweetened pumpkin puree
- 1 tablespoon vanilla extract
- 1 tablespoon finely grated orange zest
- 2 16-ounce tubs prepared white or vanilla frosting
OTHER INGREDIENTS:
- 6 or 8-inch long popsicle sticks
- melting chocolate (or chocolate discs/wafers)
- decor, sprinkles, etc.
- ribbon for the sticks (optional)
Instructions
PREPARE THE CAKE:
- Preheat the oven to 350°F. Butter two 9-inch-diameter cake pans and dust with flour.
- Sift flour and next 7 ingredients (through nutmeg) into a medium bowl.
- Using electric mixer, beat both of the sugars and the oil in a large bowl until combined (mixture will look grainy). Add the eggs, 1 at a time, beating until well blended after each addition. Add the pumpkin, vanilla, and orange zest; beat until well blended. Add the flour mixture; beat just until incorporated. Divide the batter between the prepared pans.
- Bake the cakes until a tester comes out clean- about 35-40 minutes. Cool the cakes on a rack.
FORM THE CAKE BALLS:
- Line a baking sheet (one that fits in your refrigerator or freezer) with parchment or waxed paper. Remove the cakes in pieces and place them in your food processor. Process to crumbs; dump the crumbs into a large bowl. Add one tub of frosting to the crumb mixture. Mix with the back of a large spoon (or your hands). Add additional frosting, as needed, until the mixture sticks easily together. Form quarter- sized balls with your hands and place onto the prepared baking sheet. Place the balls into the refrigerator and chill until firm (a shorter stay in the freezer would be okay too).
MELT THE CHOCOLATE:
- Melt the chocolate in a small glass bowl in the microwave in 30 second intervals. Keep checking and stirring. If you cook it too long, it will harden. It should take about a minute and a half for about a cup of chocolate. When using chocolate chips, I add about a half teaspoon of shortening to assist with smoothing it out. (fyi- white chocolate chips don't melt well- for this project, I use white chocolate disks found at a specialty baking shop).
DIP THE CAKE POPS:
- You'll need to work quickly, so make sure you have all of your decorator supplies out. A paper plate is handy to use as a 'catcher' for errant sprinkles. Take out your tray of chilled cake balls and set it near your workplace. Place a stick about a half inch into the melted chocolate and then gently push into one of the chilled balls. Hold the ball with your other hand to make sure that it goes in nicely and doesn't cause it to crack. Gently dip the ball into the melted chocolate and turn quickly to coat. Work over your paper plate to quickly sprinkle decor items onto the melted chocolate. The chocolate dries pretty fast so you need to do the decor right away. Place the decorated pop back onto your baking sheet and let set. Repeat with remaining balls, and melt more chocolate as you go along.
- Pops should be stored in the refrigerator until ready to serve. These are okay to make 24 hours in advance.
Notes
- The nutritional information does NOT include the dipped chocolate or any of the added sprinkles or candies.
- *If you'd like to use ribbon for decorating, you can glue strips of ribbon and wrap them around your sticks before using. You can also use ribbon to tie bows on the sticks after decorating.
- *You can make this recipe easier by using a boxed cake mix. Simply bake up the cake as directed, process into crumbs, and mix with 1 tub of frosting.
Nutrition
Serving: 1cake pop | Calories: 157kcal | Carbohydrates: 29g | Protein: 1g | Fat: 3g | Saturated Fat: 1g | Cholesterol: 14mg | Sodium: 109mg | Potassium: 61mg | Sugar: 22g | Vitamin A: 1345IU | Vitamin C: 0.6mg | Calcium: 19mg | Iron: 0.6mg