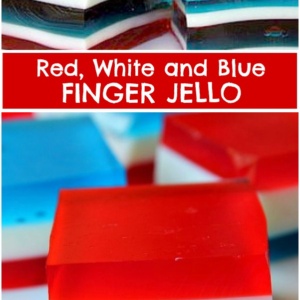
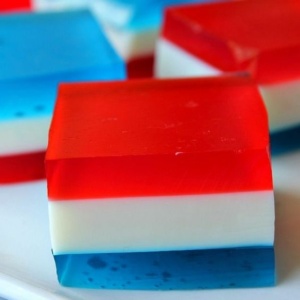
Red White and Blue Finger Jello is a treat that is festive for any patriotic holiday. Layers of red, white and blue jello make up this handheld goodie!

Kid favorite, straight ahead! Kids seem to love these little hand-held treats, and I have to admit… I think they’re good too! Remember those popular little treats called Knox Blox (back in the day?) These are similar, though not quite as firm. Kids always love munching on my Sea Glass Jello too!
I made these for the first time for a 4th of July party many years ago. The purpose was to have a sweet treat for the kids, but they were super popular with the adults too. Everyone loves finger jello. It’s just fun to eat!

How to make Red White and Blue Finger Jello:
Follow the recipe instructions below for making the red jello layer (strawberry, cherry or raspberry). Pour it into a 9×13 pyrex pan and refrigerate for at least 15 minutes to firm up the 1st layer. It’s important that you test out your fridge to make sure that the shelf you’ll be using is FLAT and level. If it’s tilted in any way, you’ll get a tilted-looking pattern for your Jell-O!
The white/milky layer comes next. The white layer isn’t actually a jello layer at all, but rather a “milk” layer created by mixing sweetened condensed milk with gelatin and water. If you’re lucky enough to find Pina Colada Jell-O(which they do carry sometimes), then you can use that in place of the milk Jello layer if you’d like. The milky layer though is rather sweet, and turns out to be a yummy layer to add to the fruity flavors. It’s poured onto the firmed up red layer, and then it’s back to the fridge for 30 minutes.
While that layer is setting, you can prepare the blue layer (blueberry will work). The blue layer of jello is poured onto the firmed up white layer, and then it’s refrigerated for at least 30 more minutes.

Just to be clear, “finger jello” is jello that you can cut into pieces and pick up and eat as a handheld treat. There are three different flavors going on in this finger jello. Make it for a summer party, and watch it fly off the table!
To make for a pretty display, cut one square larger and use a star cookie cutter to cut out a fun star shape for the middle of your platter. If you turn some of the squares upside down then your platter will show some red and some blue. It makes for a prettier display!

Here’s a 6 layer version of Red White and Blue Finger Jello that I made a few years back. I like the three layer version better- it’s much easier to make!
Here are a few more jello recipes you might enjoy:

Red, White and Blue Finger Jello
Ingredients
- Two 3-ounce boxes red jello gelatin
- Two 3-ounce boxes blue jello gelatin
- 4 envelopes Knox unflavored gelatin, divided
- One 14-ounce can sweetened condensed milk
- boiling water and cold water
Instructions
- In a medium bowl, mix two boxes of red jello with 1 envelope of unflavored gelatin. Add 2 cups of boiling water and stir to dissolve. Cool to room temperature and pour into a 9x13-inch glass pan that has been sprayed with nonstick spray. Refrigerate for 15 minutes (make sure that your refrigerator is level, or your jello will come out uneven-looking).
- While the first layer is setting, prepare the white layer. In another bowl, mix sweetened condensed milk with 1 cup of boiling water. In a separate small bowl, sprinkle 2 envelopes of unflavored gelatin over 1/2 cup of cold water. Let stand a few minutes and then add 1/2 cup of boiling water to dissolve the gelatin. Add to the milk mixture and stir to combine. Cool to room temperature. Pour this milk mixture over the first layer of red jello. Refrigerate for 30 minutes.
- While the white layer is setting, prepare the blue layer. In a medium bowl, mix two boxes of blue jello with 1 envelope of unflavored gelatin. Add 2 cups of boiling water and stir to dissolve. Cool to room temperature and pour on top of the white layer. Refrigerate for 30 minutes.
- Let jello set before cutting. Use a sharp knife to cut, and then use a metal spatula to slide underneath the jello and scoop out jello squares.
Notes
- For a festive 4th of July look, use a star cookie cutter to cut out a star-shape for the center of your platter. Place some jello squares red-side-up and some blue-side-up.
- For testing purposes, I used Strawberry & Berry-Blue flavored Jell-O. Sometimes you can find Pina Colada flavored jello (which is white), and you could opt to use that as your white layer. The milk layer though is yummy & the kids seem to like it mixed with the jello layers.
Nutrition
Nutrition information is automatically calculated, so should only be used as an approximation.


Made it for the 4th of July weekend and everyone absolutely loved it. I am making again this weekend for my son’s 40th birthday. Wonderful recipe, and very tasty!!
This was so easy and fun to make with my father-in-law. Although it looks level, we determined that his refrigerator shelf is not level thanks to this recipe.
Been wanting to make this for years. Finally did and it’s so pretty and really yummy. Thanks for great directions and I did the star cookie cutter idea. Love it! Now I want to make everything jello.
Why does it say 3 boxes of jello are needed when only 2 boxes are used in instructions?
There is an option to buy pina colada jello as the third box instead of using the sweetened condensed milk for the third layer.
I am back here again writing down the ingredients needed because my kids ask for this for EVERY 4th of July! This will be my 8th year making it, I think. So thanks for a family favorite 🥰
Great!
My kids love these and now demand them every year for the 4th! Easy to make and they look amazing. Follow the directions and you will be rewarded with a picture perfect and delicious fun food!
This is a favorite of our grandkids. I make it every year for the 4th of July. And at Christmas, I substitute the blue jello with green jello. Our oldest grandson is 21, but he’d still be disappointed if this didn’t appear on our dinner table!