
These Red White and Blueberry Cheesecake Bars are lightened up a bit. They’re the perfect dessert recipe to make in the summer with fresh berries!

Sometimes you just need a quick dessert to make and bring to a small gathering with friends. That’s how this recipe came to be. My husband and I are always (sometimes) watching our calories, and I tried my best to make this one a little bit more diet conscious.
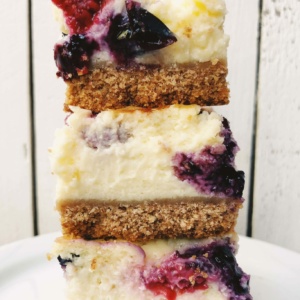
Let me begin to describe these Red White and Blueberry Cheesecake Bars for you. They start with a classic graham cracker crust (crumbs + butter) that is pressed into a pan lined with parchment paper. I use regular crumbs for this recipe because I prefer to buy the box of crumbs that are already crumbed and ready to measure, but you can certainly buy low fat graham crackers and cut the fat a little bit more. That just means you’ll need to whir them in your food processor to create crumbs yourself. The crumb crust does not need to be baked before adding the filling.

The filling is (kind of) typical of your classic cheesecake filling in that it begins with (low fat) cream cheese, sugar and eggs. A little milk and cornstarch is added in to help it set. Lemon juice is added in too.
The cheesecake batter will be thinner than you’re used to. You might be worried that it won’t bake into firm cheesecake bars but no worries necessary.After you pour the batter onto the crumb crust, you’ll drop all of the fresh berries on top.
When it comes out of the oven, I like to place it in the refrigerator for a couple of hours until it is well chilled. Then I grab the parchment paper and lift the whole thing out of the pan and transfer it to a cutting board. You can see from the photo above that the edges brown up in the baking process. I just take a large, sharp knife and cut off the edges before I cut them into squares. Then you get to eat the edges!

And there they are! Nice, clean cut edges and super pretty to boot. These creamy Red White and Blueberry Cheesecake Bars are the perfect summery dessert. You might try serving them at your 4th of July party or other barbecues you’ll be having all summer long!

If you are looking for more summer dessert recipes, you might also enjoy trying my Red White and Blue Finger Jello or this S’Mores Ice Cream Cake. A Strawberry Trifle or a Frozen Snickers Pie are also delicious choices!
If you happen to be following the Weight Watchers WW plan, you’ll find a link to the WW Points on the recipe card below
Red, White and Blueberry Cheesecake Bars
Ingredients
CRUST:
- 1½ cups graham cracker crumbs
- 4 tablespoons (1/2 stick) butter, melted
FILLING:
- 12 ounces reduced-fat cream cheese, at room temperature
- ¼ cup granulated white sugar
- 3 large eggs
- ¼ cup 1% milk
- 2 tablespoons cornstarch
- 2 tablespoons freshly squeezed lemon juice
- 1 cup fresh raspberries
- ¾ cup fresh blueberries
Instructions
- Preheat oven to 350°F. Line an 8x8-inch pan with aluminum foil or parchment paper. Spray lightly with cooking spray.
PREPARE THE CRUST:
- In a small bowl, mix crumbs and melted butter. Press mixture firmly into the bottom of the prepared pan.
PREPARE THE FILLING:
- In a large bowl, use and electric mixer to combine the cream cheese and sugar. Mix in the eggs. Place the milk in a small bowl, and slowly whisk in the cornstarch, whisking until smooth. Add the milk/cornstarch and lemon juice to the bowl and mix again until it is blended and creamy.
- Pour the filling mixture on top of the crumb crust. Scatter raspberries and blueberries on top. Bake 35 to 40 minutes, or until touch to center feels slightly firm and set.
- Cool completely (I like to refrigerate for a couple hours) before cutting. Use foil or parchment to lift the cheesecake out of the pan and onto a cutting board. Use a thin, sharp knife to cut into clean-looking bars (wiping blade clean with a paper towel between cuts). If you want every single bar to have clean cuts all around, cut off the browned edges of the whole thing before cutting into 16 bars. Refrigerate until ready to serve.
Nutrition
Nutrition information is automatically calculated, so should only be used as an approximation.


I love cheesecake bars! These look perfect for 4th of July!
Oooh I love these berrylicious cheesecake bars!!!
I wont be making this again. First of all why line the dish with tin foil? Next, not everyone owns a food processor so I had to use a blender on very low. It’s adding cornstarch that made it a disaster!! Lumps I could not smooth out for the life of me. I am a baker and this recipe needs a lot of tweaking. Never heard of using cornstarch in a cheesecake recipe either. Trying to line tin foil? I should have stopped right there rather than wasting all the butter and cream cheese for something I threw in the garbage can. Very disappointed.
It has been many years since I posted this recipe. I’m thinking I should make it again and see if I would like to post some changes. Sorry you had trouble.
I made these yummy bars last night and they came out perfect. Everyone raved about them.
Here is what I did…. I omitted the lemon zest and it was a perfect amount of lemon flavor with just the juice. I used a food processor (highly recommend) and added the cream cheese (room temp.) and sugar (hit pulse a couple times) I scrambled the 3 eggs together and added all at once (hit pulse a couple times) I slowly mixed the milk into the cornstarch whipping until smooth and then added it and the lemon juice and hit pulse a few times until it was blended and creamy. No lumps or curdles! Using the “pulse” button prevents the mixture from becoming overbeaten.
Cooking 101- you never add corn starch to any wet ingredients unless you have mixed it with a small amount of liquid until smooth.
Thanks for all of your tips- this recipe was shared many years ago, and I’m pretty sure someone had given it to me. If it’s okay with you, I’m going to incorporate your tips into the recipe so no one else will have trouble with it!
I wasted ingredients on your terrible recipe. You should have mentioned that the cream cheese must be room temperature, and one should definitely NOT throw all ingredients in together. Of course I did this the night before 4th of July and there’s no time now- I just have to use the dessert. Please, FIX THIS RECIPE!
Yikes! I’m really sorry it didn’t work out. I use a food processor, all ingredients mixed at once, and the recipe turns out just like the photo. Curious if you used a hand mixer instead?
ok- I think I salvaged mine. I had originally used a hand mixer. I transferred everything to my food processor and it chops up the cream cheese much much smaller. Hoping it will work, but posting now in case there are any others with the 4th tomorrow! If I had used a food processor initially, I wouldn’t have thought there was any problem.
I had the same problem! So upset that I’ve wasted all of these ingredients!!!! Putting thm all together and mixing just creates lumps of cream cheese in liquid. Really wish I read comments instead of just the instructions.
Making the cheese filling turned out a disaster should have read the comments more closely, what a nightmare. Maybe you should fix the recipe so no one else makes the same mistake
What did you have trouble with?
Can I substitute 1% milk with 2% milk?
Is it also okay to use a circulard springform pan?
Yes, the milk sub would be fine. I haven’t baked it in a springform pan though so I’m not sure.