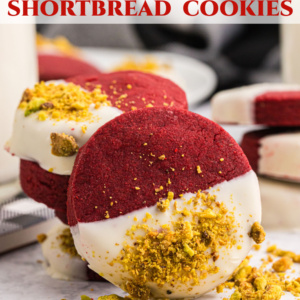
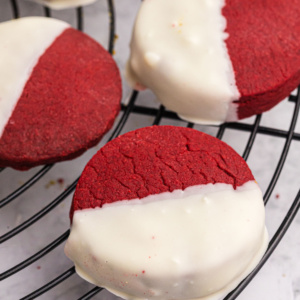
These Red Velvet Shortbread Cookies are thin and crisp. They’re half dipped into white chocolate. You could also edge them with chopped pistachios or festive sprinkles if you wish to have the red/green look.

I love these super festive red velvet shortbread cookies, and they are perfect for the holidays. Just like classic shortbread, these are not overly sweet. They call for using a teaspoon of red velvet emulsion (check Amazon), and that helps give them the red velvet flavor. They’ll be so pretty on your holiday cookie platters!

🛒 Ingredients needed:
- all purpose flour
- granulated white sugar
- unsweetened cocoa powder
- salt
- salted butter
- red food coloring
- red velvet emulsion
- white chocolate
- shortening
- festive sprinkles or chopped pistachios (optional)

✏️ How to make Red Velvet Shortbread Cookies:
*The complete, printable recipe is in the recipe card at the end of this post.
- Preheat the oven to 325°F. In a food processor, combine the flour, sugar, cocoa powder, and salt. Cover and process with on/off turns until combined. Add the butter, red food coloring and emulsion. Process with on/off turns until the mixture resembles fine crumbs. Then continue to process until the mixture begins to clump together.
- Scoop the dough onto a lightly floured surface and knead lightly until nearly smooth. Roll or pat dough to a ½ inch thickness. Using a floured 1½ inch round cutter, cut out the dough. Place the cutouts 1-inch apart on an ungreased cookie sheet. Press the scraps together, re-roll and cut more cookies.
- Bake in the preheated oven for 20 to 25 minutes or until the centers are set. Transfer the cookies to a wire rack and let cool.

In a small, heavy saucepan, melt the white chocolate and shortening over low heat, stirring constantly. Dip half of each cookie into melted chocolate. If desired, sprinkle with festive sprinkles, nonpareils or chopped pistachios. Let stand on waxed paper until set.

➡️ Tips and Substitutions:
- I make the dough using a food processor, which is easiest because it takes a bit of processing to allow the crumbs to clump together and become the proper consistency for rolling. If you’d like to try the hand-mixing method: In a medium bowl, stir together flour, sugar, cocoa powder, and salt. Using a pastry blender, cut in butter, food coloring and emulsion until mixture resembles fine crumbs and starts to cling together (it will take a while for the dough to come together). Form mixture into a ball, kneading until smooth.
- I use gel paste food coloring to color my cookies (instead of the liquid food coloring). It’s more concentrated, and you can add more of it to get a deeper color without adding liquid to the mixture. Don’t overdo it though, or you’ll end up with red stained fingers as you eat your cookies!
- Don’t skip the red velvet emulsion. It can easily be ordered on Amazon, or you can probably find it in a baking supply store. It really adds just the right amount of red velvet flavor to the cookie.

✔️ How to Store Red Velvet Shortbread Cookies:
Place the cookies in a single layer in an airtight container; cover. Store at room temperature for up to 3 days or freeze in an airtight container for up to 3 months.
What I Love About This Recipe:
- They are super festive looking for the holidays, and they are pretty for Valentine’s Day too!
- Shortbread cookies like these are good tea and coffee dunkers.
- They are a gorgeous cookie for gifting.

Best Red Velvet Dessert Recipes:
- Red Velvet Gooey Butter Cookies
- Red Velvet Cheesecake Cake
- Red Velvet Cake Balls
- Red Velvet Bundt Cake
Red Velvet Shortbread Cookies
Ingredients
- 1¼ cups all purpose flour
- ⅓ cup granulated white sugar
- 2 tablespoons unsweetened cocoa powder
- ¼ teaspoon salt
- ½ cup (1 stick) salted butter, (cold) cut up into chunks
- 1 tablespoon red food coloring
- 1 teaspoon red velvet emulsion (check Amazon)
- 3 ounces white chocolate (with cocoa butter), coarsely chopped
- 1½ teaspoons shortening
- festive sprinkles
Instructions
- Preheat the oven to 325°F. In a food processor, combine the flour, sugar, cocoa powder, and salt. Cover and process with on/off turns until combined. Add the butter, red food coloring and emulsion. Process with on/off turns until the mixture resembles fine crumbs. Then continue to process until the mixture begins to clump together.
- Scoop the dough onto a lightly floured surface and knead lightly until nearly smooth. Roll or pat dough to a ½ inch thickness. Using a floured 1½ inch round cutter, cut out the dough. Place the cutouts 1-inch apart on an ungreased cookie sheet. Press the scraps together, re-roll and cut more cookies.
- Bake in the preheated oven for 20 to 25 minutes or until the centers are set. Transfer the cookies to a wire rack and let cool.
- In a small, heavy saucepan, melt the white chocolate and shortening over low heat, stirring constantly. Dip half of each cookie into melted chocolate. If desired, sprinkle with festive sprinkles, nonpareils or chopped pistachios. Let stand on waxed paper until set.
Notes
- I make the dough using a food processor, which is easiest because it takes a bit of processing to allow the crumbs to clump together and become the proper consistency for rolling. If you’d like to try the hand-mixing method: In a medium bowl, stir together flour, sugar, cocoa powder, and salt. Using a pastry blender, cut in butter, food coloring and emulsion until mixture resembles fine crumbs and starts to cling together (it will take a while for the dough to come together). Form mixture into a ball, kneading until smooth.
- I use gel paste food coloring to color my cookies (instead of the liquid food coloring). It’s more concentrated, and you can add more of it to get a deeper color without adding liquid to the mixture. Don’t overdo it though, or you’ll end up with red stained fingers as you eat your cookies!
- For storing: Place the cookies in a single layer in an airtight container; cover. Store at room temperature for up to 3 days or freeze for up to 3 months.
- These cookies are a shortbread-type cookie and not a really sweet cookie. They have a hint of the red velvet flavor that you might be hoping for. I’d say they are more of a pretty cookie… and the white chocolate drizzle helps make them sweeter and more festive.
Nutrition
Nutrition information is automatically calculated, so should only be used as an approximation.


I made these cookies for Christmas this year and they were a huge hit. Obviously they aren’t as sweet as any old cookie, but they are shortbread and taste like shortbread (as they should).
LorAnn is a company that make emulsions . They have quite a few diffferent flavorings and I think they Red Velvet emulsion would work just perfect in this recipe.
I find my emulsions at either Ross (yes Ross), Marshalls or HomeGoods. Or you can purchase them on the website.WWW.Lorannoils.com.
They run about $6 a bottle and are worth every penny.
I hope this posting helps!
I am going to make a batch of them soon and will post how they turned out.
Happy Baking 🙂
Really gorgeous Lori! Superb!
I also am a lover a of Red Velvet! The cake has been my birthday cake since my very 1st birthday. I saw this recipe on Better Home’s website and tagged it to make this Christmas season. Then, I saw a couple reviews for it saying the cookie was awful. I’m SO glad you made them and said they’d be worth it! You’ve helped me make up my mind to make these for my cookie exchange as well. (I found your website by searching for Red Velvet Cheesecake recipes. I’m going to attempt making my first cheesecake for our Christmas dinner and hoping Red Velvet will be a hit!)