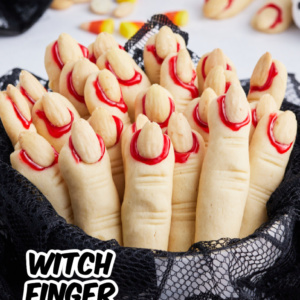
These spooky Witch Finger Cookies are my favorite Halloween cookies ever! It happens to be an easy recipe, and everyone loves these spooky treats. They’re so much fun!

These Witch Fingers Cookies are a gruesome and spooky addition to a Halloween party, and kids absolutely love them too. Unlike most Halloween cookie recipes, these are actually a delicious cookie — buttery shortbread cookies with a hint of almond. I know it’s kind of creepy to display bloody fingers on a dessert table, but it’s Halloween so that’s very much expected. People attending a Halloween party usually think they’re pretty cool!
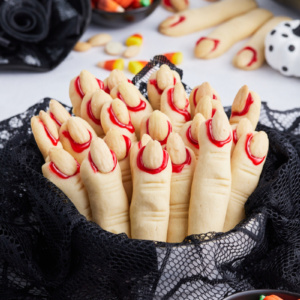
If you’re planning a Halloween menu (for either kids or adults), These are just super fun to display. Place them in a lined container so they’re standing upright and ready for grabbing. Or display them on a platter in spoke fashion. They will be a fun addition to your treat table.

Ingredients needed:
- salted butter, at room temperature
- powdered sugar
- egg
- almond extract
- vanilla extract
- all purpose flour
- salt
- almonds
- red decorator gel

How to make Witch Finger Cookies:
The complete, printable recipe is at the end of this post.
- In a large bowl, use an electric mixer at medium speed to combine the butter, sugar, egg, almond and vanilla extracts.
- In a separate medium bowl, whisk together the dry ingredients: flour and salt. Add to the wet mixture and beat just until moistened. Cover and refrigerate for 30 minutes.
- Preheat the oven to 325°F. Line 2 baking sheets with parchment paper (or lightly grease them.)
- Working with one quarter of the dough at a time and keeping the remainder refrigerated, roll a heaping teaspoonful of dough into a finger shape for each cookie. Press a blanched almond firmly into 1 end to create almond fingernail. Squeeze in the center to create a “knuckle” shape. Using a small knife, make slashes in several places to complete the look of the knuckle.
- Place on prepared cookie sheets and bake cookies for 20 to 25 minutes, or until pale golden. Let cool for 3 minutes. Lift up the almond, squeeze red decorator gel onto the nail bed and press the almond back in place at the end of each finger, so gel oozes out from underneath. If you want to get really gross, you can also make slashes in the finger and fill them with “blood.”


Remove the Witch Finger Cookies from the baking sheets and let them cool on racks (and let the red gel set). This recipe can make up to about 60 cookies.
How to make finger knuckles:
Don’t skip this part! After you squeeze the center of the cookies to create a knuckle shape. Then use a small knife to make several slashes underneath the almond nail bed and on the knuckle too. This helps create more realistic looking finger knuckles and the slashes stay in place after baking.

You really need to use blanched almonds to create a realistic look for the nails on these Witch Finger Cookies. You can sometimes find blanched almonds in bulk bins at specialty markets, but they can be expensive. If you have trouble locating them, follow these instructions for how to blanch almonds.
How to Blanch Almonds:
Place the almonds in a bowl. Pour boiling water over to barely cover the almonds. Let sit for just 1 minute (if you wait longer than that, the almonds will begin to break apart). Drain, rinse quickly under cold water, and drain again. The skins should slip right off. Pat dry. They’re ready for making witches fingers!

Don’t they look creepy and cool? They look like a severed finger, right? I’ve always loved this amazing recipe. I hope you do too. This is a great recipe for the spooky season. Enjoy!
How to store Witches’ fingers cookies:
For best results, store these cookies in a covered container at room temperature. Be sure to let the red gel set completely before storing.

What are the best recipes to make for Halloween parties?
If you’re looking for another favorite Halloween treat recipe, you might also like my Spider Web Eggs or these Eyeball Truffles. Bloody Eyeball Brownies, Black Cat Cookies and Bloody Good Cheesecake are all easy Halloween party choices! And I think my Halloween Sangria would be a perfect addition to a Halloween party.
Witch Finger Cookies
Ingredients
- 1 cup (2 sticks) salted butter, at room temperature
- 1 cup powdered sugar
- 1 large egg
- 1 teaspoon almond extract
- 1 teaspoon vanilla extract
- 2⅔ cups all purpose flour
- 1 teaspoon salt
- ¾ cup whole blanched almonds
- 1 tube red decorator gel
Instructions
- In a large bowl, use an electric mixer to combine the butter, sugar, egg, almond and vanilla extracts.
- In a separate bowl, whisk together the flour and salt. Add to the wet mixture and beat just until moistened. Cover and refrigerate for 30 minutes.
- Preheat the oven to 325°F. Line 2 baking sheets with parchment paper (or lightly grease them.)
- Working with one quarter of the dough at a time and keeping the remainder refrigerated, roll a heaping teaspoonful of dough into a finger shape for each cookie. Press an almond firmly into 1 end to create a nail. Squeeze in the center to create a "knuckle" shape. Using a small knife, make slashes in several places to complete the look of the knuckle.
- Place on prepared baking sheets and bake for 20 to 25 minutes, or until pale golden. Let cool for 3 minutes. Lift up the almond, squeeze red decorator gel onto the nail bed and press the almond back in place, so gel oozes out from underneath. If you want to get really gross, you can also make slashes in the finger and fill them with "blood."
- Remove from baking sheets and let cool on racks (and let the red gel set).
Nutrition
Nutrition information is automatically calculated, so should only be used as an approximation.


Ty for sharing. .
To make these look extra creepy, rub some cocoa powder on them after they are baked. It makes them look “dirty” and old. My kids love these. I have to make them every Halloween. It’s been 13 years and counting!
Thanks for the tip!
Is it any secret how they keep the same shape? Mine became giant’s fingers ?
Hmmmm, I’ve never had that happen before! They should remain pretty much the shape that you make them with very little spreading. Make sure the dough is refrigerated well.
I made these last year and they came out great!!
Questions – Would it be OK to mix up the dough tonight, leave it in the fridge for a day and bake them tomorrow night?
Or better yet, mold them all tonight, and keep them in the fridge overnight and throw them in the oven tomorrow night (if I have the fridge space..)? Should I increase the bake time in this case?
Should be okay. Might have to let them sit on the counter for a bit to get a little bit softer.
I love making these and it’s been a looooong time. Just watch that you don’t overbake them. I found mine were a little too brown – or maybe it was the type of baking sheet I used (clay) and I should have used a metal one. The paler they are the more creepy they look.
Good tip- thank you!
We made similar ones using coconut – but yours look so much better!
I made these cookies using my own sugar cookie recipe. I also added green food coloring to the mix. They expanded quite a bit but still looked great. I also went a little heavy with the “blood”. They looked soo cool and creepy! I will be making these again next year. Wish I could post a picture.
Glad they worked out! The cookie recipe included is more of a shortbread recipe, which does not spread out much at all. Might be a better choice than a sugar cookie.
Nice. I’ve seen more than a couple food bloggers making similar cookies, but yours are far and away the best looking ones.
My fingers turned out a little wide. Next time I will roll thinner and make the knuckles more pronounced before baking. I used some black frosting gel on the knuckles, which turned out well. An easier way to blanch is to boil the almonds for exactly one minute, then pour into a colander and rinse immediately with cold water. Skins slipped right off.
I can’t wait for Halloween so I can make these and the eyeball cookies for our office party! Sooooo Gross! And as I was looking at the list of recipes, there were a couple more that I want to make too