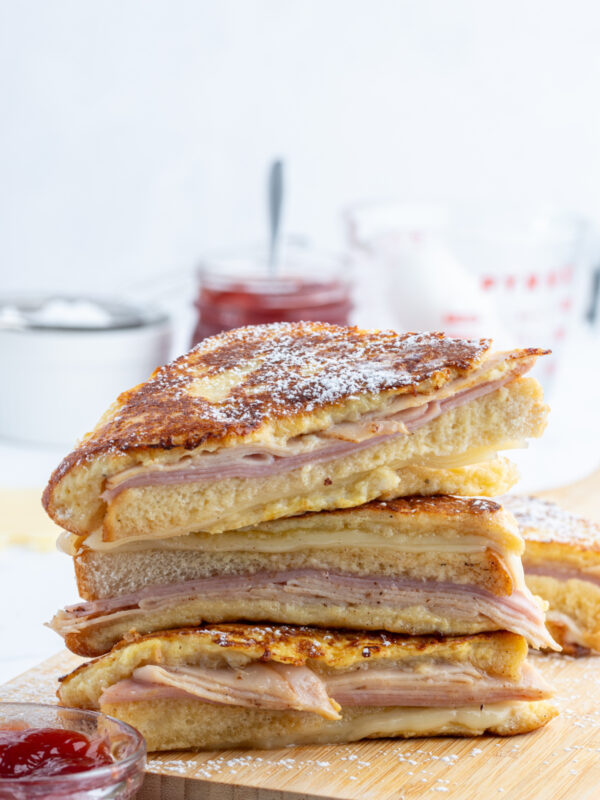
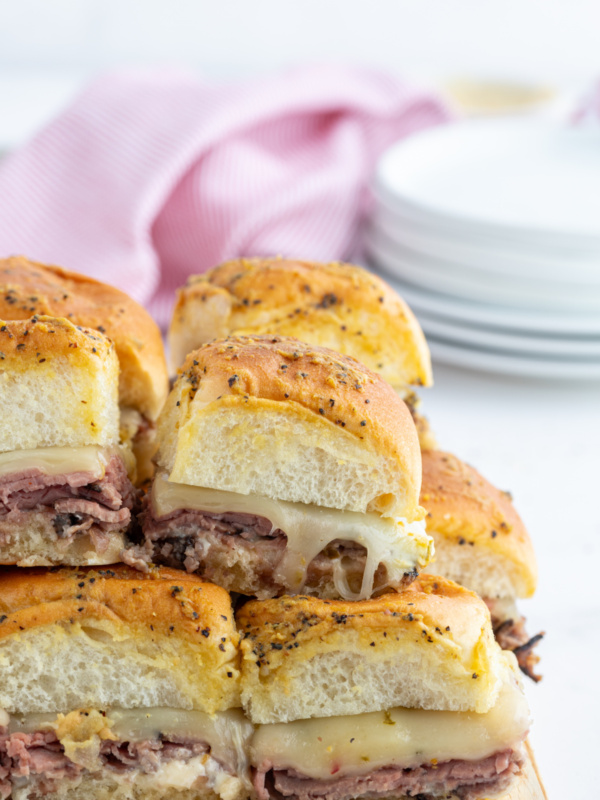
These Baked Ham and Cheese Sliders are perfect for parties. I’ve seen different versions of these baked sliders around the internet for quite some time now. And this is the first time I’ve ever made them! Using King’s Hawaiian rolls is key to their success. We’re kind of addicted to them around my house. Plenty of ham and Havarti cheese are stuffed inside, and a buttery mixture is drizzled on top.
Watch the video in the post showing you how to make these sliders, then scroll to the very bottom of this post and print out the recipe so you can make them at home.

Baked Ham and Cheese Sliders
Sliders are perfect for parties. You can bake a big batch, and pull them out for everyone to enjoy. So easy to pull apart and watch that melted cheese pull and stretch, they’re often the first thing to go on your party food display table! Everyone agrees… they’re delicious!
What is a slider?
“Slider” is an American term for a small steam-grilled sandwich made on a small bun. You can serve sliders as an appetizer, a snack or a main dish.

How to make Baked Ham and Cheese Sliders:
You’ll need just a few ingredients to make these incredible little sandwiches. You can use any slider buns for this recipe, but I highly recommend you locate the King’s Hawaiian buns and buy those. They’re sweet, and they’re so delicious with ham and cheese for this recipe. You’ll also need deli ham and cheese, of course. I like to use Havarti cheese because it melts so nicely. You can also use a thin sliced Swiss cheese if you prefer.
The buttery sauce that goes on top is made up of butter, honey mustard, minced dried onion and Worcestershire sauce. That’s it!
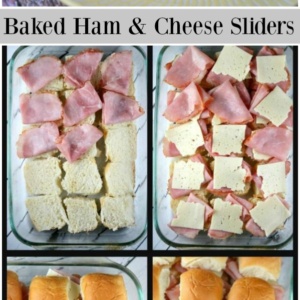
This recipe is so easy to make. You’ll begin by cutting the buns or rolls in half. The bottoms of the buns are placed into a 9×13-inch pan. Then they’re topped with a folded piece of deli ham.

Next, you’ll layer cheese, more ham and more cheese. As you can see, you don’t have to be so neat and precise with your cheese, Just tear it apart into small pieces that will fit the roll. All of that cheese is going to melt and make these baked ham and cheese sliders so wonderful!

Place the tops on all of the rolls.

The final step is to add the sauce to the tops of the rolls. You’ll simply melt the butter and then whisk it with the rest of the ingredients. It might seem strange that you’re just going to spoon the jazzed up, melted butter on the tops of the rolls, but that’s exactly what you’re going to do. That buttery mixture baked right onto the tops of the rolls.

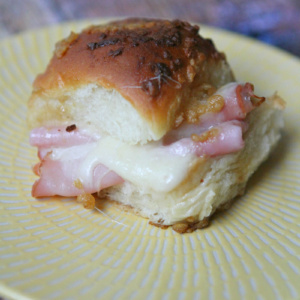
And here they are hot out of the oven. They’re best when they come right out of the oven. You can make these ahead and just cover with plastic wrap in the fridge until you’re ready to pop them into the oven. I suggest you double or triple the recipe!
I love these sliders so much, and everyone I serve them to fall in love with them as well. They’re a hearty treat with all of that ham and cheese, that buttery mixture soaked in, and they get slightly toasted on top. YUM. These would be a great addition to a Super Bowl party or holiday party, and they’d be great for any other sort of friendly gathering too.

What’s the difference between a slider and a burger?
The burger chain White Castle actually coined the term “slyder” to describe their onion-steamed small burgers. They used the term from 1985 to 2009. As you can probably guess, the general public latched onto that and decided that small sandwiches made on buns could also be “sliders.” That’s how it all began! You’ll more often see sliders on restaurant menus that are mini burgers. Pulled pork sliders are pretty common too. Now it’s time to try Baked Ham and Cheese Sliders!
If you are looking for more great slider recipes, you might like to try:
- Turkey Sloppy Joe Sliders
- Carolina BBQ Pork Sliders
- Salmon Sliders w/ Tangy Avocado Sauce
- Cubano Sliders
- Filet Mignon Caprese Sliders
- Taco Sliders
- Slow Cooker Pulled Pork Sliders with Bourbon Peach BBQ Sauce
Baked Ham and Cheese Sliders
Ingredients
- ½ cup (1 stick) butter, melted
- 1 tablespoon honey mustard
- 1 tablespoon minced dried onion
- 2 teaspoons Worcestershire sauce
- 15 King's Hawaiian Rolls
- 16 ounces thinly sliced deli ham
- 10 slices Havarti cheese
Instructions
- If you are preparing this to eat right now, preheat your oven to 350℉. Spray a 9x13-inch baking dish with nonstick spray.
- In a medium bowl, whisk together the butter, mustard, onion and Worcestershire sauce.
- Slice the rolls in half. The easiest way to do this is if you open the package and slice the entire chunk of rolls in half while they are still stuck together. Pull apart the bottoms of the rolls and place them in the prepared dish. Fold up pieces of ham to fit the rolls and place them on the bottom halves of the rolls. Layer a piece of cheese next, then more ham, then more cheese. Place the tops of the rolls onto the sliders. Drizzle a teaspoon of the buttery mixture over the top of each roll. If you have some of this mixture left over, you can make a few more sliders. Otherwise, drizzle the rest of the mixture over the tops of the sliders.
- If baking now, place in the oven and bake for about 20 minutes- until the sliders are warmed, the cheese is melted and the tops of the rolls are lightly browned. If baking tomorrow, cover the pan with a sheet of greased foil and refrigerate. The next day, bake for 20 minutes with the foil on, then remove the foil and bake for an additional 10 to 15 minutes. Serve immediately!
Nutrition
Nutrition information is automatically calculated, so should only be used as an approximation.


We made these with leftover baked ham from Easter dinner and they were delicious! My husband loved them, going to try your filet mignon sliders next, great recipe!!
I made these for a family gathering and everyone loved them, they disappeared quickly and bonus, so easy! I highly recommend
My son always requests this when he comes home from college. Thank you!
These are great. Can you use any cold cut?
Sure!
This recipe was a hit. Very easy and delicious!
Made these for the game this weekend, man they were a big hit!
What an easy and yummy breakfast idea. These were just so SO good. And your step by step photos were so helpful when making it for my family. Thanks for yet another great recipe Lori.
I loved it! Perfect for feeding a crowd!
Total comfort food. LOVE this recipe!